













Combining 3D Printing and UV Printing for Durable Graphics
3D printing has transformed the way businesses and makers develop prototypes, manufacture custom components, and bring new ideas to life. From engineering workshops and product designers to hobbyists and small businesses, 3D printing offers a fast and flexible way to create parts on demand.
However, when it comes to adding vibrant colours, branding, labels, or detailed graphics, traditional 3D printing can become expensive and time-consuming. Multi-colour printing often requires specialised hardware, multiple filament types, and longer production times.
That's where UV printing comes in.

By combining 3D printing with UV printing, businesses can produce high-quality custom parts while adding full-colour graphics, logos, serial numbers, and decorative finishes after printing. The result is a more efficient workflow, lower material costs, and professional-looking finished products.
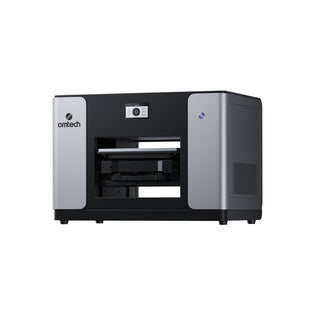
In this guide, we'll explore how UV printing complements 3D printing and why more makers and manufacturers are integrating UV printers such as the OMTech Spectra Series into their production process.
Why UV Printing Works So Well with 3D Printed Parts
UV printing uses specially formulated inks that cure instantly when exposed to ultraviolet light. Unlike traditional printing methods, the ink dries immediately, creating a durable and scratch-resistant finish.
For 3D printed parts, this offers several advantages:
- Vibrant full-colour graphics
- Sharp text and fine detail
- Durable, wear-resistant markings
- Fast production with no drying time
- Professional branding and product customisation
Whether you're producing prototypes, personalised products, industrial components, or promotional items, UV printing allows you to add graphics after the part is printed, eliminating the need for complex multi-colour printing setups.
This approach can significantly reduce production costs while increasing design flexibility.
How to Combine 3D Printing and UV Printing
Step 1: Print Your Part
Begin by producing your component using your preferred 3D printing technology.
UV printing works well with many common 3D printing materials, including:
- PLA
- ABS
- PETG
- Nylon
- Resin-based materials
- Composite materials
For best results, design the part with a flat or gently curved area where graphics, text, or branding will be applied.
Step 2: Prepare the Surface
Before UV printing, clean the part to remove dust, fingerprints, oils, or residue from the printing process.
In most cases, a simple wipe-down is sufficient to ensure strong ink adhesion.
Proper surface preparation helps achieve sharper graphics and long-lasting durability.
Step 3: Load the Part into a UV Printer
Once prepared, place the part inside a flatbed UV printer such as the OMTech Spectra.
The printer applies ink using precision printheads while integrated UV lamps instantly cure the ink during printing.
This process creates highly detailed graphics that bond directly to the surface of the part.
Many UV printers also feature vacuum tables that help secure components during printing, ensuring accurate positioning and consistent results.
Step 4: Apply Graphics, Text, and Branding
UV printing allows you to add a wide range of visual elements, including:
- Company logos
- Product branding
- QR codes
- Serial numbers
- Barcodes
- Safety labels
- Instructional graphics
- Decorative artwork
- Full-colour images
- Raised texture effects
- Spot gloss finishes
Because the graphics are applied after the part is printed, you gain complete creative freedom without changing your 3D printing setup.
Why UV Printing Is More Efficient Than Multi-Colour Filament Printing
Multi-colour 3D printing can produce impressive results, but it often comes with additional complexity.
Depending on the setup, it may require:
- Multiple extruders
- Automatic filament changers
- Frequent filament swaps
- Additional calibration
- Longer print times
- Higher material costs
For many applications, only a small section of the part requires colour, branding, or labelling.
Using UV printing allows you to produce the entire component in a single material and add colour only where needed.
This provides several benefits:
Lower Material Costs
Instead of purchasing and managing multiple filament colours, you can use standard materials and rely on UV inks for graphics and branding.
Faster Production
UV printing occurs after the part is complete, avoiding interruptions caused by filament changes during printing.
Greater Design Flexibility
Updating a logo, changing artwork, or customising individual products becomes simple without modifying the original print file.
Improved Durability
UV-cured inks offer excellent resistance to:
- Scratches
- Moisture
- Everyday wear
- Handling during transport and use
This makes UV printing ideal for functional products that require clear, long-lasting markings.
Applications Across Multiple Industries
The combination of 3D printing and UV printing is being used across a growing range of industries.
Product Development and Prototyping
Designers can apply realistic branding, packaging graphics, and product markings directly onto prototypes, helping stakeholders visualise the final product before production.
Manufacturing and Engineering
UV printing is ideal for adding:
- Part numbers
- Serial numbers
- Assembly instructions
- Asset tracking information
- Safety warnings
directly onto 3D printed components.
Medical and Educational Models
Colour coding, labels, and instructional graphics can be added to anatomical models, training aids, and educational displays.
Consumer Products
Businesses producing personalised products can create:
- Custom gifts
- Branded merchandise
- Collectables
- Promotional items
- Consumer electronics accessories
with professional-quality graphics and finishes.
Signage and Display Products
3D printed display elements can be enhanced with UV-printed branding and graphics for retail, events, and exhibitions.
A More Cost-Effective Production Workflow
For many businesses, combining 3D printing with UV printing delivers the best balance of flexibility and efficiency.
Rather than investing in complex multi-material printing systems, you can:
- Print parts quickly using standard materials.
- Add professional graphics afterwards with UV printing.
- Reduce material waste.
- Simplify production.
- Improve turnaround times.
Because UV inks cure instantly, parts are ready for handling, assembly, packaging, or shipping immediately after printing.
This streamlined workflow is particularly valuable for small production runs, custom orders, and on-demand manufacturing.
Bring Your 3D Printed Products to Life
3D printing excels at creating custom shapes and functional components. UV printing adds the finishing touch by delivering vibrant colours, durable graphics, and professional branding.
Together, they create a powerful production workflow that helps businesses produce customised products more efficiently and cost-effectively than traditional multi-colour printing methods.
Whether you're developing prototypes, manufacturing functional parts, or creating personalised products, UV printing can help transform ordinary 3D prints into premium finished products.
Discover the OMTech Spectra UV Printer Series
The OMTech Spectra Series makes it easy to add professional-quality graphics to your 3D printed parts.
With high-resolution printing, instant UV curing, automated maintenance features, and support for a wide range of materials, Spectra printers help businesses streamline production while achieving exceptional results.
Explore the OMTech Spectra Series and discover how UV printing can unlock new possibilities for your 3D printing workflow.