



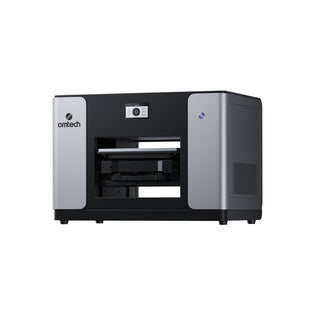











OMTech Spectra UV Printer Maintenance Guide

Routine maintenance is one of the most critical factors in keeping a direct-to-substrate UV printer running smoothly, producing consistent high-resolution prints, and avoiding costly downtime in your workshop. Like any piece of precision machinery, the OMTech Spectra UV printer relies on clean components, proper airflow, and well-maintained fluid dynamics to perform at its best. While UV printers are engineered for rugged durability and commercial efficiency, neglecting basic upkeep under harsh Australian workshop conditions—such as dry heat, airborne sawdust, or humidity—can lead to issues like clogged nozzles, deflected ink lines, or premature mechanical wear.
The good news is that maintaining the OMTech Spectra doesn’t require a degree in mechanical engineering—the system is designed to automate the heavy lifting. By establishing a disciplined, regular maintenance schedule, you can significantly extend the operational lifespan of your machine, protect your print quality, and ensure reliable day-to-day production. This guide walks through the essential daily, weekly, and deep-cleaning steps every Spectra operator across Australia should know to keep their asset performing at a peak professional level.
1. Active White Ink Circulation and Self-Cleaning Automation

Because white UV ink contains heavy titanium dioxide solid pigments, it is naturally prone to settling when left stagnant. If left unchecked, this sedimentation causes severe blockages within the fine channels of the printhead. The OMTech Spectra mitigates this with automated fluid dynamics:
-
Continuous White Ink Circulation: The system constantly circulates ink from the white reservoir through the internal fluid lines directly to the printhead. Any excess or purged ink is deposited into the ink pad, which drains cleanly into the internal waste ink reservoir for safe disposal.
-
The 12-Hour Automated Maintenance Routine: Even when your workshop is closed and the Spectra is sitting on standby, the machine actively executes its 12-hour self-preservation function. It automatically checks the printhead status, runs a micro-purge, and injects specialized moisturizing fluid into the capping station. This keeps the nozzle plate completely moist, preventing ink from skinning under ambient conditions and ensuring the machine is ready to print immediately the next morning.
2. Bulk Ink Refill Procedure

The Spectra features an open bulk-fluid architecture, dramatically slashing your consumable overheads compared to proprietary cartridge systems. When refilling the fluid circuits, follow this clean procedure:
-
Access the Reservoirs: Remove the protective rear access cover from the printer chassis to reveal the individual CMYK, White, and Cleaning Solution tanks.
-
Agitate the Fluid: Unscrew the reservoir caps. Crucial Step: Thoroughly shake the new bulk refill bottles for at least 30–60 seconds before opening to redistribute any settled pigments.
-
Pour and Seal: Carefully top up the corresponding reservoirs, ensuring absolutely zero cross-contamination between colors. Always ensure the dedicated cleaning solution reservoir is filled as well. Firmly screw the reservoir caps back on.
-
Prime the Lines: On the integrated machine touchscreen, navigate to Control and select Load Ink to draw the fresh fluid through the lines and purge any micro-air bubbles from the dampener circuit.
3. Regular Operational Cleaning Protocol

A. Waste Ink Management
The waste container collects all residual fluids generated during printhead priming, automatic purging, and cleaning cycles.
-
Action: When the fluid level nears capacity, the integrated physical indicator light on the machine will illuminate. Immediately slide out the container, dispose of the waste chemical fluids in accordance with your local state environmental regulations, clean the receptacle, and reinsert it.
B. Printhead Face Upkeep
Over long print runs, stray UV mist or static dust can collect on the perimeter of the printhead nozzle plate.
-
Action: Gently wipe the face and perimeter of the printhead using a specialized, lint-free microfiber cleanroom cloth moistened with approved UV cleaning solution.
-
Long-Term Storage Note: If your business is shutting down for a holiday period or extended break, ensure the machine remains powered on at the main isolator switch so the auto-cleaning cycles can run. Alternatively, perform a manual head flush before shut down.
C. Capping Station and Rubber Wiper Blade
The rubber wiper blade physically scrapes excess ink off the printhead face, while the capping station forms an airtight seal over the nozzles when idle. If these are covered in cured ink buildup, they will fail to clean or seal the head properly.
-
Action: Using a clean, lint-free foam swab dipped in cleaning solution, carefully wipe away any ink residue around the rubber seals of the capping station and along both sides of the flexible wiper blade.
4. Step-by-Step System Deep Cleaning (Fluid Flush)
When switching ink types, preparing the machine for long-term transport, or recovering missing nozzle lines after heavy commercial production runs, a deep fluid purge is required.

Step 1: Remove the Printhead Gantry Cover Power down the machine mechanics safely and use a precision screwdriver to remove the protective outer printhead carriage shell. Store the fastening screws securely in a magnetic tray.
Step 2: Reset and Align the Gantry Turn the system back on. On the touchscreen control panel, select Reset to return the printhead carriage precisely to its physical home origin point.
Step 3: Prepare the External Flush System Pour clean, approved UV flush solution into your maintenance bottle and secure the cap tightly. Ensure the internal pick-up tubes are touching the absolute bottom of the bottle.

Step 4: Swap the Fluid Input Ports Carefully disconnect the primary ink supply lines from the machine's manifold ports. In their place, securely connect the fluid tubes coming from your cleaning solution maintenance bottle.


Step 5: Execute the Chemical Flush On the touchscreen control panel, navigate to Control, then press Load Ink. The internal pumps will now pull pure cleaning solvent through the entire internal fluid manifold and dampeners, cleanly flushing out all pigment particles through the printhead nozzles into the waste pad. Repeat until the fluid passing through the head runs completely clear.

Protecting Your Production Margins
Proper preventative maintenance is the ultimate dividing line between a UV printer that suffers from unexpected breakdowns and one that delivers dependable, high-margin, professional results year after year. By spending just a few minutes on these routine tasks, you drastically reduce the risk of head clogs, eliminate print defects, and keep your production workflow running at maximum efficiency—saving your business both time and money.
Engineered specifically with high-volume commercial workshops in mind, the OMTech Spectra balances industrial-grade printing performance with an incredibly straightforward, automated maintenance design. Backed by local Australian technical support and an extensive warranty network, it is a smart, reliable asset built to scale your business with total confidence.
Discover how the Spectra can streamline your custom manufacturing workflow today at omtech.au. Fulfill your local customer orders with absolute precision and zero hassle.